

No one actually looks forward to the time when they need to clean the vinyl siding of their house, largely because of the fact that doing so is a lengthy process that requires know-how and perseverance. While standard dirt buildup can be ignored for awhile, the development of mold and mildew tends to take on an unsightly greenish appearance that’s disconcerting to say the least, especially if you walk by it everyday to go to work or school. While mold and mildew may seem particularly difficult to remove at first glance, you’ll be able to do so in an efficient and timely manner by following these seven steps.

1. Identify the Cause of Mold or Mildew Buildup
The first thing you’re going to want to do is find the cause for the buildup or mold and mildew, as doing so will allow you to remove the substances for good. Some of the most common causes of mold and mildew growth include a malfunctioning gutter, malfunctioning sprinklers, or just problems with running water. It’s also important that you understand that it’s possible for all three of these causes to be the reason for the development of mold on your siding. Taking care of the root cause of the problem first and foremost will greatly reduce the chances of this problem recurring in the near future.
2. Prepare Your Home For the Removal
The next step you’re going to want to take is to prepare your home for the removal and cleaning of your siding. You should heavily considering shutting off the mains power and covering any outlets and lamps within your home. You can use plastic sheeting when covering outlets and lamps, which can then be duct taped until you’ve finished cleaning the walls. The main reasons to take such a precaution is due largely to the fact that you could suffer from electrocution or go through an electrical malfunction if these items aren’t tended to.
3. Utilize an Effective Cleaning Solution
The most important aspect of any mold and mildew removal from vinyl siding is the cleaning solution you make use of when cleaning the area, as you want to be certain that the removal of the mold and mildew growth worked as intended and that it won’t return soon after cleaning it. There are a wide range of effective cleaning solutions and mixtures that can be utilized during this project. One of the more popular solutions used when cleaning vinyl siding is to mix three parts of distilled white vinegar with around seven parts of water. This solution can be mixed in a bucket. If you’re searching for a more potent solution, consider mixing one part bleach with four parts of water. Either of these solutions will assist you in getting rid of mold and mildew on your vinyl siding and should show immediate results.
4. Scrub the Affected Area
Once you’ve finalized your solution and are ready to start cleaning your vinyl siding, it’s time to scrub the affected area. This can be accomplished with a soft-thistle brush, preferably a long-handled one so that you can reach spots that are higher up on the wall. Any spots that consist of staining from mold and mildew should be gently scrubbed, as harder scrubbing could cause damage to the siding. The most effective pattern when scrubbing the siding is from top to bottom.
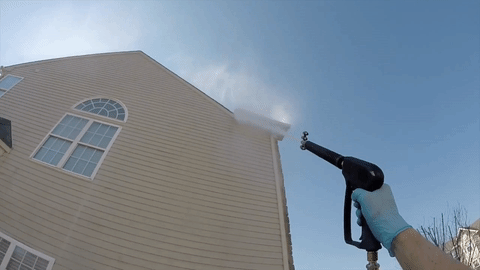
5. Pressure-Wash the Siding
Now that you’ve fully scrubbed the affected area, you’ll need to pressure-wash the siding so as to actually remove the mold and mildew from the siding. Take your cleaning solution and pour it directly into your sprayer or pressure-washer. Consider making use of a lower pressure setting or pressure-washer, as higher pressures can cause some damage to the siding. Once you’ve poured your cleaning solution into the tool you’re using the spray the siding, spray a small section of around 5 ft. of the siding, starting from the ground and working your way up. Throughout this process, it’s important that you don’t place the pressure-washer at an angle, as the resultant spray could sift under the layers of siding. Instead, the solution should be sprayed in a way that it hits the top of the siding. Once you get to higher sections of the siding, you may want to consider using a ladder.
6. Spray Clean Water on Siding
Once you’ve finished this process for the first 5 ft. of siding, you’ll want to pour the cleaning solution back into the bucket and rinse the sprayer. The sprayer should then be filled with clean water. After filling it with water, take the sprayer and spray the area where the cleaning solution has just been applied, making sure to start from the top of the siding so that the water runs downward. Do this until the cleaning solution has been removed. By the time you’re finished with this step, that area of the siding should be free of mold and mildew.
7. Repeat Final Three Steps Until Finished
In order to fully remove mold and mildew from your vinyl siding, it’s important that you complete steps 4-6 on each 5 ft. section of the siding. Once you’ve finished cleaning the entire wall, you can be confident that the mold or mildew has been removed for good.
As long as you pay strict attention to the guidelines mentioned previously, your siding will be clean and you’ll no longer have to deal with the health issues and other problems that result from the growth of mold and mildew.


